
Saturday, August 17, 2013

More on lawn seed-- adding mini clover

It is about that time of year when lawn patching should be done. 

I want to share my experience with a recent addition to my lawn seed mix: mini clover. Mini clover has all the benefits of white clover without some of the problems. I added mini clover to may lawn seed mix last year and I am very happy with the performance.

Mixed with my usual blend of grasses (see below), mini clover grows among the grass plants (forming small leaves when cut), feeding the lawn nitrogen, and aerating with deep roots. The nitrogen is released into the soil throughout the growing season (until the first frost). Thus, nitrogen is available when and where it is needed, and so there is no risk of runoff or burning. Because nitrogen is continually and slowly available during the growing season there is a reduced presence of disease like powdery mildew, rusts, and smut that can appear due to an overabundance of nitrogen (see http://www.uri.edu/ce/factsheets/sheets/turffungaldis.html).

Traffic tolerance of turf containing mini clover will be superior to traditional turf or traditional white clover. Like other clover, mini clover fertilizes and improves wear tolerance in general. Also, because it is shorter, it does not suffer from being chopped to the stolon during mowing (which can make traditional clover can be difficult to retain when it exceeds mowing height).


Additionally, mini clover is semi-aggressive species (not as aggressive as White Dutch Clover), filling in bare spots where traditional grass may not repair for months. Mini clover competes well with weeds, thus reducing the need for herbicides. Note that broad-leaf herbicides will also kill mini clover so be careful with your weed control.

You can rad more and purchase mini clover at Outside Pride.

My grass seed mix*:
40% Fescue
30% Perennial rye
20% Kentucky Bluegrass
10% Mini clover
 
*Note that the first  four in the list are found in Allen Sterling and Lothrop's Bayscaper Mix.

--I received no compensation for this review.--

Cheers,

Mark

Wednesday, August 7, 2013

Celebrating 5 Years!


I am amazed that my WormMainea blog is 5 years old.  I've written almost 100 blogs in that time on topics ranging from vermicomposting to organic gardening to energy efficiency (with some nature and adventure blogs inserted here and there).

When I look back at my posts and I see the number of views and comments, I see that you, my readers, have wide ranging interests as I do—vermicomposting and organic/natural approaches to energy efficiency and posts about nature. I will continue to post on these topics and others.
 
I hope you, my readers, find my blog interesting and informative, but mostly I hope you enjoy reading it (at least as much as I enjoy writing). 

Coming up: I am planning future blogs on the following topics:
  •  other people's worm bin pics. If you have a bin that you’d like to show, please send me a photo and brief description. There are many varieties of worm bins and I’d like to show that breadth on my blog for others to consider.
  • homemade Christmas gifts
  • outdoor composting
  • vermicompost separation (or sorting) with accompanying video
  • shingles
Let me know if you have any questions or would like me to blog about any other vermicomposting topics. 

Also, if you have not already, please LIKE WormMainea on Facebook.

Cheers and thank you for reading.

Mark

Friday, August 2, 2013

How long do I have to wait before I can harvest compost from my worm bin?


This is a question that I receive very frequently. The answer is... it depends (everyone loves that!). 

In this case, it really depends on a number of factors:  1) what you feed your worms (that is, the type of food) 2) whether you put the food in whole or chop it up and 3.) how warm the soil is.  Note that these are all factors that you can control. I will describe the factors in greater detail below and tell you how to speed up the process (assuming that is what you want to do).

1. Type of food that you feed your worms
This may or may not be obvious, but the types of food you regularly feed make a big difference on how quickly your vermicompost will be ready to harvest. Consider strawberries and potatoes left out on the kitchen counter. In 3-5 days the strawberries will turn to mush and be covered in a grey, fuzzy mold. In that time the potatoes have only gotten in the way and even after a few months all that will happen is that they may turn a bit green and sprout from a few of the eyes. The same thing in your worm bin-- some foods (like tree fruit) decompose really quickly. Whereas other foods (ground contact veggies and fibrous food) breakdown very slowly. Every family will have a different mix of food that breaks down at different rates, so only you can estimate how quickly the foods that you typically add will decompose. If you want to make things go very quickly, add more foods that break down quickly.

2. Surface area of the food
If you chop/grate/mash/slice or otherwise make your food smaller (more easily accessible for decomposition), it will breakdown more quickly. For some foods, this includes freezing or heating the food to break the cell walls prior to placing it in the worm bin. For example, squash breaks down more quickly when cooked and leafy greens turn to mush after freezing. In general, if you juice your food (everything going into your bin is pulp), your worm bin can be ready to harvest in as little as 60 days. If you want to make things go very quickly, increase the surface area or break the cell walls using a food processor/blender and/or heat/freeze before adding to your worm bin.

3. Soil temperature
Soil temperature dictates the activity of the worms as well as the other organisms that assist in the decomposition of the food. In general, warmer temps make the process go more quickly. I recommend your soil temp remain between 65-75F to prevent problems. Temps above 75F can rapidly move into the 90+F range which will most likely kill your worms. I recommend a soil thermometer and a gentle warming method (like a root heater for seedlings). If you want to make things go very quickly, warm your worm bin soil up to 70-75F.

So if you want to speed things up, now you know what to do. 

Cheers,

Mark

Sunday, June 16, 2013

Acceptable damage: patience and the organic method

With the organic approach you have to be patient and allow nature time to work. This is difficult for me (if you know me, you understand), but I try. A good example of patience is aphids and our plum trees.


Plum (Stanley)  tree.
I love these plum trees. We planted them in the hope that eventually they would produce enough plums to make a pie (but I digress).

A large part of the organic approach is surveying your property. That means walking around and looking at plants to see what's going on. Last week I noticed that there were aphids on the new growth, and that they were starting to make the leaves curl. Some would respond with a spray of poison, but I know better than that. I wanted to grab the hose and spray them all down with a strong stream of water (aphids are weak and many would die with just a strong stream of water knocking them from the leaves).

My plum trees are healthy and can survive a little damage.  And, I know that if I leave them (and don't spray poison), the predators will come (and not be killed by the poison). The predators will feed on the aphids and then multiply to make more predators.

Aphids are at the bottom of the food chain, and are prey to a bunch of wonderful beneficial predators (lady bug beetles, predatory wasps, etc.). So, against my nature, I decided to do nothing and let nature work (the population of prey should serve as a magnet for their predators).

The magnet!

One week later, and here are the results-- HOORAY!!! The predators are here.

(You may need to click on the photos and enlarge to see the subjects in the following photos.)

Look closely-- that's an Assassin bug-- SO COOL! They control a wide range of pests. 
Lady bug beetles. The adults and nymphs eat aphids like grapes.

Eggs of something. (If you know what these are, send me an e-mail.)

Predatory wasp.

A different predatory wasp doing his thing (laying eggs inside the aphids). Just one o'clock from center.
Aphids after the predators-- the black aphids show that the predatory wasps have been there and more wasps are on the way.

The predators responded to the bloom of the aphid population and, because my trees are not coated with poison) they are controlling the outbreak. The predators will multiply and thrive in my yard and surroundings to control future outbreaks (I'm pesticide free, so there is nothing to harm the natural predators-- who control many pests). More importantly, the damage to my trees was very minimal, and I have another reminder as to the many benefits of the organic approach and giving nature time to work.

My next step for these plants is a band of Tanglefoot (on the lower trunk of the trees) keep the ant and caterpillar population down.

I should be enjoying some plums in early September. YUM!

Cheers,

Mark

Friday, April 12, 2013

The Joys of Teaching Vermicomposting

I truly enjoy teaching about vermicomposting.

These photos are from a class I taught in Scarborough in February through the Adult Ed program.

That evening was quite snowy. Despite the weather more than a dozen people turned out to learn about indoor vermicpomposting.

The photos below show some of the highlights of the class.

Cheers,

Mark


Saturday, March 9, 2013

Juicing and worms-- a perfect combination


That is, juicing fruit and vegetables and feeding the pulp to the worms, NOT juicing worms! :)

In many ways, juicing and keeping a worm bin is a wonderful cycle:
1. You  harvest fruit and veggies from your garden that is fertilized by your vermicompost.
2. You make juice from the fruit and veggies.
3. You take the leftover pulp and feed your worms.
4. You harvest vermicompost and fertilize your garden

We like the Omega J8004 juicer

Omega J8004 Juicer with all the parts


It is relatively small, yet reasonably powerful, and easy to clean. It was a little more expensive than other models, but it feels really durable and the assembly/disassembly of the parts makes sense. I am very happy with the juice it makes, too! The only concern some have is that you have to cut the food into pretty small pieces. It is true, but that doesn't trouble me.


Here is a recipe for a lunchtime juice for 2 people

 Ingredients:
3 small apples
4 carrots
2 celery stalks
1 large beet
2 radishes
Small handful wheat grass
¾ cup chopped cabbage
1 knuckle ginger
2 peeled clementines
1 baby cucumber


Ten cups of a variety of fruit and veggies makes juice for two


Chop it all up to ½ inch pieces and feed into juicer.


Nice small pieces work best

Use tamper (GENTLY!) to push veggies into the feeder tube

The juice falls out of the bottom and the waste pulp goes to the left

The dry pulp goes into your worm bin-- it breaks down really quickly for the worms to eat.

The juice is almost done!
 
This makes 2 pints of juice—a perfect lunch for two! In general 10 cups of chopped material makes 2 pints of juice.


Cheers!
 
Cheers,

Mark


Friday, February 1, 2013

Making Sauerkraut

Making Sauerkraut

From a bit of online research I learned that British explorer and navigator Captain James Cook was given the Copley medal by the Royal Society in 1776 for demonstrating that eating sauerkraut could prevent scurvy in sailors during long sea voyages. Scurvy, a disease that results from vitamin C deficiency, was a common disease for sailors in the 18th century. Sailors often had no access to fresh food while at sea for an extended period, and sauerkraut is high in vitamin C.

Sauerkraut, German for "sour cabbage", is made by chopping cabbage and soaking it in brine to ferment through the action of lactic acid bacteria. Sauerkraut is a common condiment throughout eastern Europe. 

Here is my recipe for making sauerkraut with photos of the steps.

Equipment:
Ceramic crock or food-grade plastic bucket, one-gallon capacity or greater (my crock is 5 liters, but I typically only fill 1/2 to 2/3 of the way)
Plate or weights that fits inside crock or bucket
Cloth cover (like a napkin or towel)
Optional (lid for crock)
Food processor, grater, mandolin, or knife

I clean everything thoroughly and give it all a dilute vinegar rinse (acid conditions are what you're going for, so this is good).

I'm using a Gairtopf fermentation crock that is ideally suited for fermenting, but you don't need this to be successful.

Ingredients:
Sauerkraut and sea salt (or canning salt).  Don't use table salt which contains iodine.

11 pounds of fresh cabbage (red or green). You're shooting for about a 5% brine solution (the water will come from the cabbage-- I will explain later) which is approximately 6 Tablespoons of salt for 10 pounds of cabbage. If you start with 11 pounds of cabbage, you'll end up with closer to 10# after cleaning (removing outer leaves and the hearts).
If you need to make more brine to cover your cabbage (unlikely). You just make more 5% salt solution (3 Tablespoons of salt per quart of water).

Making Sauerkraut:

Chop or grate cabbage (without hearts) finely or coarsely (however you want your final sauerkraut to be). I find that using a knife is both really messy and takes a long time.


 A few years ago I stopped using a mandolin for making sauerkraut after an accident that resulted in a trip to the ER, several stitches, and a reattached (though now numb) tip of the little finger on my right hand. I now use the grater attachment of out Kitchen Aid mixer. Though noisy, it makes less mess and is pretty quick. Put the shredded cabbage in a large bowl as you chop it.

Pack into crock and add a sprinkle salt on the cabbage as you go.

The salt extracts water from the cabbage and creates the brine. The salt also prevents the cabbage from getting mushy.


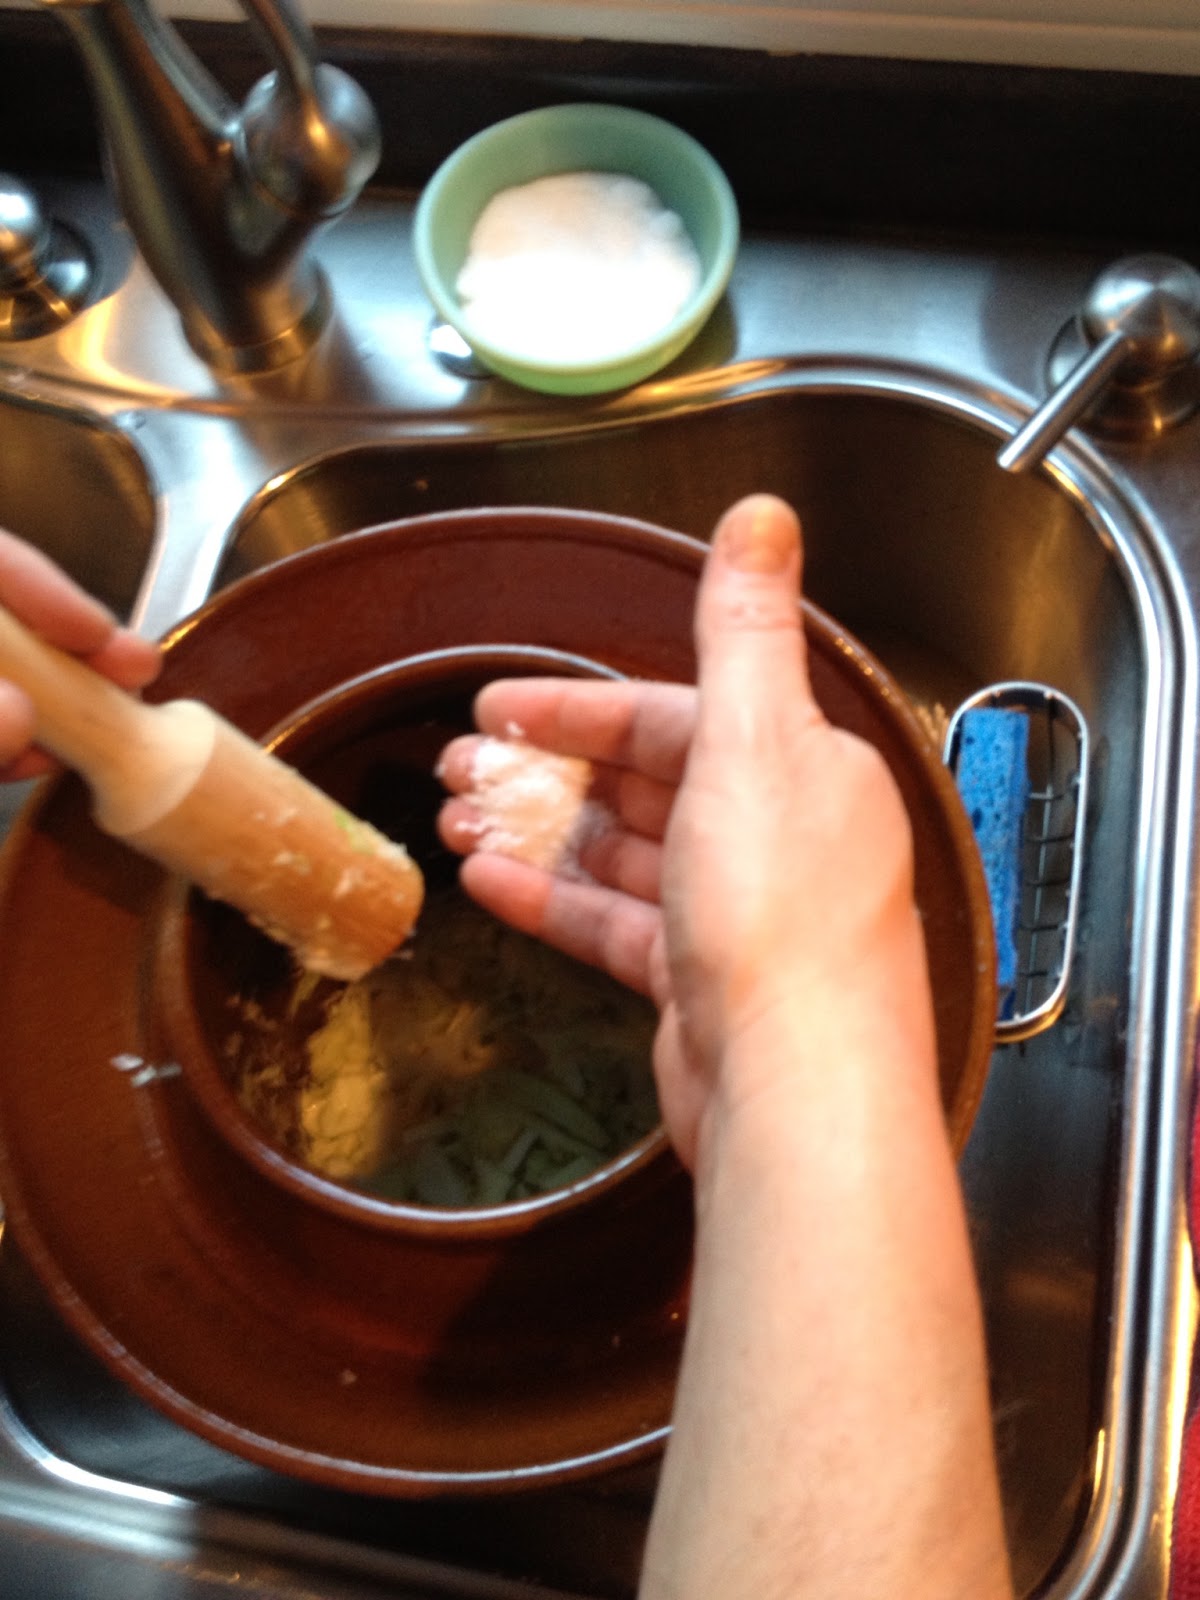
Although I'm just making cabbage sauerkraut in the photos, you can add other vegetables (grated carrots), fruit (apples), and herbs/spices (dill or celery seeds, juniper berries). It's your sauerkraut so make what you like. You want to pack just a bit into the crock at a time and tamp it down hard with your fists or a potato masher. I like the wooden tamper that came with the Kitchen Aid mixer. This prevents air bubbles in the crock and bruises the sauerkraut to help release the water. Put a clean plate or the crock weights on the sauerkraut and press down firmly.


You won't get enough water out of the cabbage right away, so you need to wait. Cover kraut with a cloth and press down on the plate or weights every few hours.


By the next morning, enough time has passed that the water is drawn out of the cabbage so that the cabbage and weights are submerged beneath the brine. Cover with the crock lid and fill the water ring. If the brine does not rise above the plate level by the next day, you can add your own brine solution to cover. You must keep the weight and cabbage submerged to get good sauerkraut!


Now leave it a few weeks to ferment. The fermentation is slower in cool weather, so try it in 2-3 weeks in summer and 3-4 weeks in winter. We like our sauerkraut pretty stinky (in a good way!) and it is cold this time of year, so I'll probably let this sit for a month. Taste your sauerkraut by removing the lid and weights and dipping into the fermenting cabbage with a clean fork. If it's not ready, then smooth the surface of the cabbage and press down on the weights to submerge and let it ferment longer. When the sauerkraut is how you like it, put in jars and refrigerate with a tight lid (you do not need to heat process can it). When you open the jars, the kraut will begin fermenting again (albeit slowly in the fridge). This is how we learned that we like our sauerkraut a bit more fermented than we originally thought.

Although less common in the Gairtopf crock (because the water ring results in a good seal), sometimes you'll get mold on the surface of the brine. Don't freak out. Skim what you can off of the surface (a dry paper towel followed by a measuring cup work really well); though you will probably not be able to remove all of it. Rinse off the weight and taste the kraut. 

Bert loves our homemade sauerkraut and eats it most mornings with her eggs. It has a nice tangy taste with a decent crunch. So much better than the canned stuff in stores!

If you're interested in making your own sauerkraut, I'd suggest some reading. Sandor Katz has a great book Wild Fermentation that is both a resource for recipes and a source for inspiration.


Other links of interest:

http://en.wikipedia.org/wiki/Sauerkraut
http://www.kitchenproject.com/history/sauerkraut.htm
http://www.herbs2000.com/articles/08-05-22_sauerkraut.htm
http://www.wildfermentation.com/resources.php?page=sauerkraut
http://www.extension.umn.edu/distribution/nutrition/DJ1091.html

Cheers,

Mark


UPDATE April 6, 2013

And two months later the finished product is ready to put in jars. You know it's finished when the taste is just tangy enough. It will mellow a bit once you put it in the jars and store in the fridge.

The eleven pounds of cabbage made 5 full large mason jars and a little extra.


Sauerkraut ready to eat and store in the fridge. ENJOY!

Enough to get us through to cabbage harvest.

Cheers,

Mark