Thursday, December 23, 2010

Virtual Tour of the WormMainea Worm Farm

I have received several requests to tour my worm farm. I think people are imagining something like you might see on Dirty Jobs (http://dsc.discovery.com/videos/dirty-jobs-worm-rancher.html) where a commercial vermicomposting operation is growing worms in a greenhouse or similar scale operation.

I run WormMainea as a hobby and not as a business, so my scale is much smaller. It really is just a bunch of worm bins in my basement. There is not much to see. Here are some photos of the stacks of bins (does this make it a worm bin farm?). I currently have 15 active bins (this is typically a slow period so I don't need to have a lot of bins going). 14 big bins (2 full for harvesting; 6 that are a  week to a month from harvest ready; and 6 that are in active growth) and 1 demo bin (ready to split for shows this spring).

Six bins near the furnace. These are the ones that are almost ready to harvest.

Nine bins shown here (8 18 gallon and my demo bin). These are my ready for harvest bins, demo bin, and active growth bins.
Sorry if you were disappointed, but growing worms is really easy. You don't need anything elaborate. Scaling up is really a matter of more bins and a system to ensure that all the bins get sufficient food and are harvested at the right time (either for castings or worms). After Christmas holiday, I will bring more bins downstairs and split any ready to harvest bins that I don't sell to get ready for the spring rush and demonstrations.

The most exciting part of the whole operation is feeding them (and of course harvesting!). I give my worms a combination of food from our kitchen as well as food waste collected from the deli at Lois' Natural Marketplace (tip of the hat to Chris, the chef at Lois' for bagging the food for me).


Cheers and Merry Christmas!

Mark

Saturday, December 11, 2010

Vermicomposting Christmas Gifts

A story that I heard a while back told of a worm bin and pound of worms as the hot item at a Yankee swap Christmas party. I love hearing things like this. I offer gift certificates on my website (see http://www.wormmainea.com/Gifts.html


I believe that a worm bin and pound of worms make a great gift at any time of year. 
Worm bins need not be expensive or complicated. I think a simple bin is really a lot easier to use (and certainly easier to build!).

In my mind, the perfect gift would be a book on vermicomposting (like Mary Appelhof's book Worms Eat My Garbage: How to Set Up and Maintain a Worm Composting System), a pound of worms and a new bin (or a WormMainea gift certificate for these).

If you are already vermicomposting, you can provide the worms and make the bin. If you're an experienced vermicomposter, you can provide a vermi-consultation and skip the book. The more people we have vermicomposting the better.

If you are looking for other gift ideas, I recently created Amazon lists of my recommended vermicomposting supplies, as well as favorite garden tools and books.

You can view these at:

WormMainea vermicomposting tools and supplies.


Cheers,

Mark

Saturday, December 4, 2010

Making Kombucha

First what is kombucha?

Kombucha is fermented tea. Wikipedia has a great summary of history: http://en.wikipedia.org/wiki/Kombucha

We started drinking commercially produced kombucha a few years ago and really enjoy it. Earlier this year, commercial kombucha became unavailable and I researched making it at home. We found a SCOBY through a local permaculture group, so we started making it at home. I think the fresh kombucha is better than what we got from the store (and MUCH less expensive!).

I don't know about all the health claims, but we have found kombucha settles upset stomachs. In general, we just like it!

How can you make it?

The key to making kombucha is finding a starter culture or SCOBY (symbiotic colony of bacteria and yeast). Look on CRAISGLIST or check local natural or health food store postings for people who will share their SCOBY.

Kombucha instructions can be complicated and confusing, so I am sharing simple instructions for brewing, harvesting, and enjoying your own great-tasting kombucha.

What do you need?
2 quarts (plus 1 cup) of water - if your water is not good, use bottled distilled or bottled spring water
A stainless steel pot that will hold that much water allowing top space for water to come to a rolling boil.
2/3 cup of granulated white sugar
Paper towel or clean cloth and rubber band to cover the brew vessel.
A 4-quart brew vessel. We use the jar pictured below. Here's what we use.


Brew vessel with SCOBY and some tea to start next batch
1. First clean your workspace as if you are going to cook a meal. Pour the 2 quarts of water into the freshly washed stainless steel pot. Add one extra cup of water to allow for evaporation. Add 5 tea bags. I always use black tea.
2. Boil the water for 5 minutes.

Everything ready to go. Water is in pot, sugar and tea bags are at hand.

Water is ready to boil.

Add tea bags while water is heating
3. Remove tea bags.
4. Add the 2/3 cup of white granulated sugar and stir  to dissolve.

Boil water with tea bags. Remove tea bags and add 2/3 c sugar. Let cool.
5. Remove from heat and let cool to room temperature (test by checking the pot temp on the inside of your wrist). Warm is OK. Hot is NOT.

6. When cool - pour into brew vessel with the SCOBY and some starter tea (a few cups). Don't worry is SCOBY floats or sinks (it doesn't matter). Don't fill to top-- leave a few inches of head space.

7. Cover the bowl or jar with a paper towel or clean cloth. Secure the cover with the rubber band.

8. Place the fermenting vessel out of direct sunlight. Kombucha brews faster in warm areas.

9. Keep the cover in place during the fermentation process. Also, try not to jostle the brew vessel. Just leave it alone and wait 1 week. You'll see a new SCOBY being formed on top of the kombucha.

10. Taste your tea. If it is too sweet, let it brew another day and taste again. Otherwise, you can harvest...

11. Harvesting! When the taste is right for you (very subjective, since some like their kombucha sweet), it is time to harvest. I keep our kombucha in a milk jar in the fridge with a vented lid. Do not keep at room temp or in a container with a tight-fitting lid, because your tea is alive and can explode if not carefully monitored! Short periods are OK (in fact this is how you get fizzy kombucha, ala GT Dave). I like mine just a little fizzy as it comes out of the brew vessel. Harvest 2 quarts of kombucha. You always want to leave some in the brew vessel.

Harvested kombucha ready to drink for the week. Keep in fridge.
12. Remove some of the SCOBY. You will have 2 after a brew cycle. You can't hurt your SCOBY by handling. You can use tongs or your hands. If you are going to use bare hands, be sure to scrub thoroughly. The 2 SCOBYs may be 'stuck' together. Pull apart gently.


This is the SCOBY. I'm removing this to the fridge as backup.

13. Place one SCOBY in your fridge in clean container with some kombucha. This is your backup SCOBy in case something goes wrong. After a few cycles, you will have spares you can give to friends or CRAIGSLIST.

14. Repeat brew cycle.

Cheers,

Mark

Friday, November 19, 2010

Return Audit Results

After completing the work for the 2010 Home Energy Savings Program, we had our house audited again.

See related blog (http://wormmainea.blogspot.com/2010/08/home-efficiency-2010-continued-flir.html) for initial FLIR photos and discussion. Since the original audit we undertook a number of retrofits as discussed in related blogs

http://wormmainea.blogspot.com/2010/08/home-efficiency-2010-continued.html, http://wormmainea.blogspot.com/2010/09/air-sealing-top-and-bottom-of-house.html, http://wormmainea.blogspot.com/2010/10/water-heater-wrap-up.html,
http://wormmainea.blogspot.com/2010/11/air-sealing-electrical-outlets-on.html, and http://wormmainea.blogspot.com/2010/11/work-in-attic-air-sealing-and.html

The following show side-by-side photos before and after for same or similar areas of our home. Note that the temperature difference between inside and outside is greater now than when the audit was conducted back in August (44° vs. 65°) as compared to (82° vs. 95°). A greater difference inside vs. outside would mean that any air movement would show up more easily in the FLIR camera.

Before photo of the porch
After photo of the porch.
We didn't make any changes to the porch, so the photos are essentially the same.

Before photo of the attic hatch.
After photo of the attic hatch.
The attic hatch shows a dramatic reduction in airflow. In the recent photo you can see the bolts and wing nuts, but you don't see any air leaking.


Bert's office before.
Bert's office after
I think this photo is pretty impressive also. In the earlier photo, you can see air moving between the ceiling joists. In the current photo you don't.

Basement sill before
Basement sill after
Here again, the movement of air was reduced. The difference in air flow for some of the areas is quite dramatic, but my overall airflow wasn't reduced by a whole lot as measured by the blower door. I was hoping for a really big reduction. I don't recall the exact number right now. Erik said this was to be expected to some extent. Our house was already pretty tight and it would take some more invasive work to drop it much lower. Nevertheless, we did control some important trouble areas-- like Bert's office and the work we did meets the minimum requirement for the rebate-- 25%*. That puts my ROI at between 6-7 years at current oil and electricity prices. 

* Erik said: "The final value for my home was 1585 CFM and the final savings [as calculated by the software] was 36%. I've mentioned a few times that EM's software is pretty generous but I'd be comfortable saying real world savings around 25% [that's the number I'm using]. Another question that may arise is whether the house is 'too tight' and that it 'needs to breathe'. The BTL (Building Tightness Limit; the engineered standard for necessary air flow) for your house was 1343 CFM50. That's the point at which you need to begin adding mechanical ventilation to make up for natural air flow. You can compensate with intermittent ventilation to 70% of BTL (940) after which dedicated continual ventilation is needed. So your house is well over the various air thresholds."

I can't wait to save money and be more comfortable this winter.

Cheers,

Mark

Sunday, November 7, 2010

Work in the attic: air sealing and insulating the soffits & adding more insulation

This is a job that I did not do myself. I had the work done by an expert to be sure it was done correctly with minimal damage to the exterior.

All work by Randy Vanier (Vanier Construction, Inc. 207-671-7454).

First, the problem: air infiltration into the house through the soffit and escaping from the proper vent (pink vent in the photos below) into the ceiling of the main floor. As shown in the photo below, Randy discovered that we had no insulation in the eaves either. Lots of work is needed to remedy this.

Surprise! No insulation. No wonder it is so cold in here.
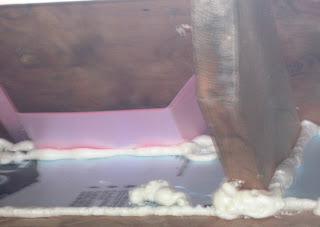
To ensure proper air flow, Randy placed a proper vent in the space above that extended from the soffit area to above the insulation in the attic. As shown in the series of photos below, he then cut pieces of XPS foam insulation and used spray foam to hold everything in place and force any air to move through the vent into the attic space (rather than around it).

Test fitting the proper vent and rigid foam insulation.
Here is how the test fit looks from inside (before proper vent)

First step with spray foam behind foam board insulation and all cracks.
Everything spray foamed tight and sealed so air can only go into the attic space via the proper vent
A side view of the work, note this will be covered by the soffit so it is all hidden
Here's how it looks when finished

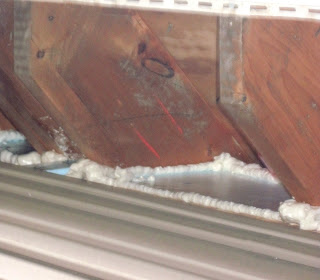
So that completes the air sealing the soffits. Next Randy added insulation in the eaves.


Randy was finished at this point, so I added some foam board insulation on top of the batts to make an insulated space that should make the bedrooms warmer and less drafty. 

Eave area with the foam board insulation and spray foam.
When budget permits, I may go back and insulate the floor with foam board insulation also. For now, I am calling it quits.

The final step was to add an additional 15" of blown in loose fill insulation to the attic area.

Attic showing additional blown-in loose fill.


I am looking forward to having Erik North back next week to evaluate our home and get the rebate into the State.


More than that, I anticipate we will be much more comfortable this winter while using less oil to heat our home.

Cheers,

Mark
Saturday, November 6, 2010

Air Sealing Electrical Outlets on Exterior Walls

Have you ever noticed a cold draft when plugging or unplugging something on a bitter cold morning? I have at my house. This is a sure sign that you need you need to air seal and insulate!

Standard 2x6 construction means an electrical box leaves little room for insulation in exterior walls. As soon as you have a hole in the wall, you have a path for air to move, and you are making a hole in the wall for electrical service.

This is a reasonable job that doesn’t require a lot of money, but it does take some time to do correctly. Each outlet only takes 2-3 minutes, but moving furniture to access all of them adds a lot of time to the job and if done right, you can't see the change.

What you’ll need:

Screwdriver,
Caulk,
Outlet foam insulation,
Damp cloth.

The process is simple, remove faceplate and fit the gasket to the back of the faceplate (trim as needed).Then make a thin line of caulk on the back of the gasket. Place back on wall and press down to get a tight fit. screw down the faceplate and wipe away any excess caulk.

I found this image online:

I am not using the child-proof covers or plug gaskets, but the wall gasket and caulk seem to stop drafts.

Cheers,

Mark

Sunday, October 24, 2010

Water heater wrap up


Here is the GeoSpring heat pump water heater installed and ready to go.


I am looking forward to a future blog on how it is working. I will wait until I have some usage data first.

Cheers,

Mark

Monday, October 18, 2010

Cat waste and worms

At the Common Ground Fair this year a number a people asked me about cat waste and vermicomposting.

An obvious concern with pet waste is pathogens and the potential for human contact (see related post: http://wormmainea.blogspot.com/2010/05/making-doggie-dumpster-pet-waste.html). This was a pretty common thread of the discussions. The cautions in that blog all apply to cat waste. And for pregnant women perhaps even more so.

Another visitor had tried this and found that non-clay litter works best. I think newspaper-based litter was preferred. Others mentioned  coconut- or  pine-based litter. I also found wheat-based litter, but none of my discussions touched on that. I suspect any of these would be suitable for a vermicomposting system.

Another friend wrote in with this article (http://www.amnh.org/nationalcenter/youngnaturalistawards/2005/Eric.htmlA) about a direct vermicomposting system.

All very interesting. I am very allergic to cats, so I must rely on others. Nevertheless, the discussions are interesting and provide an alternative to sending the organic waste to the landfill.

Cheers,

Mark

Friday, September 17, 2010

How well does organic lawn care work?

In an earlier blog (http://wormmainea.blogspot.com/2010/04/natural-lawn-care-preparing-and-timing.html), I described organic lawn care practices. I think it is time to revisit the lawn to see how successful organic methods are.

This was a hard Summer with lots of heat and not much rain. I watered during the drought when we didn't get rain for more than 7 days. All watering was before 8AM and no more than 1 inch of water. My lawn and underlying soil were fed with worm tea at least once monthly during the summer. I use about 7 gallons on my lawn. I did not mow during the drought (only hawkweed grew and I could pull those by hand) and raised mowing height on my Fiskars push mower during summer months to 4". The next photo shows my front lawn (approximately same angle as previous photos from April).
Same angle of yard as previous photos-- taken September 9.

Even more interesting are other areas of my lawn. Especially those abutting my neighbor who uses traditional methods-- cutting with a riding mower weekly whether it needs it or not (often mowing lower than I am), random (or so it appears) watering, professional (?) fertilization/weed control by lawn service. I will let the photos below speak for themselves.


My lawn on right, traditional on left (property line is between stake and rhododendron)


Opposite angle my lawn on left, traditional on right (property line between stake and rhododendron)
The undeniable fact is that by paying attention to the biology of your lawn plants your lawn will require less work and money and be more resilient to stress-- whether drought, weed competition, or pests.

Cheers,

Mark

Wednesday, September 15, 2010

Air Sealing-- top and bottom of the house.

When I started this home efficiency retrofit, I thought I would have trouble hitting the 25% improvement minimum. Now with the heat pump water heater (see photo prior to plumbing hookup), the Real Home Analyzer software is projecting we’ll be at 34%. WOW!
Our new heat pump water heater!

Let’s look at the air sealing component in greater detail. The majority can be done by you. In fact everything you see here I did to remedy the air flow problems in my home (for details see http://wormmainea.blogspot.com/2010/08/home-efficiency-2010-continued-flir.html).

Air Sealing the Attic Access Hatch
All you have to do is add insulation to the top of the access hatch and make a secure seal (gasket) around the lid. In this case, I added 4” of rigid foam insulation to the top (glued to the plywood) and glued the fiberglass pad on top of that. To the surround, I added some self stick gasket. Also, I added some blots and wing nuts to make the attic hatch compress the gasket to make a secure seal. This looks the same from inside my closet (not that it matters much)-- all you can see is the ends of the bolts and wing nuts. See photo of finished product.

Nice and tight-- no more dancing attic hatch on windy days.


Air Sealing the Sill Plate
This is a bit trickier, but only because my basement is semi-finished. Often the photos and instructions you see online are homes where there is no impediment to air sealing. In my house I had to remove the floor insulation and cover.

Floor insulation and cover hanging to access the sill plate area.
 With that out of the way, you can see the sill area-- the sill itself is behind that batt of the fiberglass insulation-- remember the fiberglass is not inhibiting air flow, it is only filtering it. Fiberglass insulation is only effective if you have controlled air flow. In my house, I had to work around plumbing & heating pipes, electrical, phone & cable lines-- all of which were typically located in this area. Not a big deal, but it made the job a bit trickier.

Sill area exposed-- note all the utility service lines.

 Now you remove all those batts of insulation-- I dropped mine on the floor while I worked.

Insulation batt that will be replaced after air sealing.


Now we can see the sill plate. It is a little tricky in this photo, but he bottom of this piece of wood is resting on the top of the cement basement wall. The size of these areas (in general-- some are smaller!) is approximately (and a little larger than) 9" x 14.5". 


Sill plate area exposed.

So I cut a bunch of pieces of 1/2" rigid foam board insulation to that size. These fit the holes (mostly) and left a little space for spray foam. The finished job is shown in the next photo. To control airflow I tried to really have the cement area covered with the blue insulation and spray foam.


Air sealing is complete-- HOORAY!
After the spray foam hardens, go back and add the batt of insulation and replace the floor insulation and covering. Now the job is completely finished.
Air Sealing the Chimney Chase (in the basement)
This was easy and really necessary-- we had a noticeable draft here that you could feel with your hand. Because the chase is in a flammable zone, you have to use fireproof caulk and spray foam. It is twice as expensive as regular, but it is easy to work with and you don't need a lot. All you need to do is seal the spaces around the aluminum pieces.
Air sealed chimney chase in basement.
Close up of sealed chimney chase in basement.
 At some point (when the sun is not so strong), I will go up to the attic to seal the top side of the chimney chase the same way.


While you have the basement ceiling pulled open, check that your utility holes are sealed. The oil service holes were not sealed well, so I gently removed the old caulk and sealed them up with spray foam.
Air sealing the oil access holes.
Next weekend I will tackle air sealing the electrical outlets on the first and second floors.

Cheers,

Mark