Saturday, March 9, 2013

Juicing and worms-- a perfect combination


That is, juicing fruit and vegetables and feeding the pulp to the worms, NOT juicing worms! :)

In many ways, juicing and keeping a worm bin is a wonderful cycle:
1. You  harvest fruit and veggies from your garden that is fertilized by your vermicompost.
2. You make juice from the fruit and veggies.
3. You take the leftover pulp and feed your worms.
4. You harvest vermicompost and fertilize your garden

We like the Omega J8004 juicer

Omega J8004 Juicer with all the parts


It is relatively small, yet reasonably powerful, and easy to clean. It was a little more expensive than other models, but it feels really durable and the assembly/disassembly of the parts makes sense. I am very happy with the juice it makes, too! The only concern some have is that you have to cut the food into pretty small pieces. It is true, but that doesn't trouble me.


Here is a recipe for a lunchtime juice for 2 people

 Ingredients:
3 small apples
4 carrots
2 celery stalks
1 large beet
2 radishes
Small handful wheat grass
¾ cup chopped cabbage
1 knuckle ginger
2 peeled clementines
1 baby cucumber


Ten cups of a variety of fruit and veggies makes juice for two


Chop it all up to ½ inch pieces and feed into juicer.


Nice small pieces work best

Use tamper (GENTLY!) to push veggies into the feeder tube

The juice falls out of the bottom and the waste pulp goes to the left

The dry pulp goes into your worm bin-- it breaks down really quickly for the worms to eat.

The juice is almost done!
 
This makes 2 pints of juice—a perfect lunch for two! In general 10 cups of chopped material makes 2 pints of juice.


Cheers!
 
Cheers,

Mark


Friday, February 1, 2013

Making Sauerkraut

Making Sauerkraut

From a bit of online research I learned that British explorer and navigator Captain James Cook was given the Copley medal by the Royal Society in 1776 for demonstrating that eating sauerkraut could prevent scurvy in sailors during long sea voyages. Scurvy, a disease that results from vitamin C deficiency, was a common disease for sailors in the 18th century. Sailors often had no access to fresh food while at sea for an extended period, and sauerkraut is high in vitamin C.

Sauerkraut, German for "sour cabbage", is made by chopping cabbage and soaking it in brine to ferment through the action of lactic acid bacteria. Sauerkraut is a common condiment throughout eastern Europe. 

Here is my recipe for making sauerkraut with photos of the steps.

Equipment:
Ceramic crock or food-grade plastic bucket, one-gallon capacity or greater (my crock is 5 liters, but I typically only fill 1/2 to 2/3 of the way)
Plate or weights that fits inside crock or bucket
Cloth cover (like a napkin or towel)
Optional (lid for crock)
Food processor, grater, mandolin, or knife

I clean everything thoroughly and give it all a dilute vinegar rinse (acid conditions are what you're going for, so this is good).

I'm using a Gairtopf fermentation crock that is ideally suited for fermenting, but you don't need this to be successful.

Ingredients:
Sauerkraut and sea salt (or canning salt).  Don't use table salt which contains iodine.

11 pounds of fresh cabbage (red or green). You're shooting for about a 5% brine solution (the water will come from the cabbage-- I will explain later) which is approximately 6 Tablespoons of salt for 10 pounds of cabbage. If you start with 11 pounds of cabbage, you'll end up with closer to 10# after cleaning (removing outer leaves and the hearts).
If you need to make more brine to cover your cabbage (unlikely). You just make more 5% salt solution (3 Tablespoons of salt per quart of water).

Making Sauerkraut:

Chop or grate cabbage (without hearts) finely or coarsely (however you want your final sauerkraut to be). I find that using a knife is both really messy and takes a long time.


 A few years ago I stopped using a mandolin for making sauerkraut after an accident that resulted in a trip to the ER, several stitches, and a reattached (though now numb) tip of the little finger on my right hand. I now use the grater attachment of out Kitchen Aid mixer. Though noisy, it makes less mess and is pretty quick. Put the shredded cabbage in a large bowl as you chop it.

Pack into crock and add a sprinkle salt on the cabbage as you go.

The salt extracts water from the cabbage and creates the brine. The salt also prevents the cabbage from getting mushy.


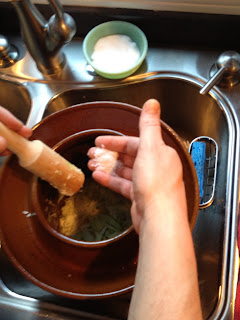
Although I'm just making cabbage sauerkraut in the photos, you can add other vegetables (grated carrots), fruit (apples), and herbs/spices (dill or celery seeds, juniper berries). It's your sauerkraut so make what you like. You want to pack just a bit into the crock at a time and tamp it down hard with your fists or a potato masher. I like the wooden tamper that came with the Kitchen Aid mixer. This prevents air bubbles in the crock and bruises the sauerkraut to help release the water. Put a clean plate or the crock weights on the sauerkraut and press down firmly.


You won't get enough water out of the cabbage right away, so you need to wait. Cover kraut with a cloth and press down on the plate or weights every few hours.


By the next morning, enough time has passed that the water is drawn out of the cabbage so that the cabbage and weights are submerged beneath the brine. Cover with the crock lid and fill the water ring. If the brine does not rise above the plate level by the next day, you can add your own brine solution to cover. You must keep the weight and cabbage submerged to get good sauerkraut!


Now leave it a few weeks to ferment. The fermentation is slower in cool weather, so try it in 2-3 weeks in summer and 3-4 weeks in winter. We like our sauerkraut pretty stinky (in a good way!) and it is cold this time of year, so I'll probably let this sit for a month. Taste your sauerkraut by removing the lid and weights and dipping into the fermenting cabbage with a clean fork. If it's not ready, then smooth the surface of the cabbage and press down on the weights to submerge and let it ferment longer. When the sauerkraut is how you like it, put in jars and refrigerate with a tight lid (you do not need to heat process can it). When you open the jars, the kraut will begin fermenting again (albeit slowly in the fridge). This is how we learned that we like our sauerkraut a bit more fermented than we originally thought.

Although less common in the Gairtopf crock (because the water ring results in a good seal), sometimes you'll get mold on the surface of the brine. Don't freak out. Skim what you can off of the surface (a dry paper towel followed by a measuring cup work really well); though you will probably not be able to remove all of it. Rinse off the weight and taste the kraut. 

Bert loves our homemade sauerkraut and eats it most mornings with her eggs. It has a nice tangy taste with a decent crunch. So much better than the canned stuff in stores!

If you're interested in making your own sauerkraut, I'd suggest some reading. Sandor Katz has a great book Wild Fermentation that is both a resource for recipes and a source for inspiration.


Other links of interest:

http://en.wikipedia.org/wiki/Sauerkraut
http://www.kitchenproject.com/history/sauerkraut.htm
http://www.herbs2000.com/articles/08-05-22_sauerkraut.htm
http://www.wildfermentation.com/resources.php?page=sauerkraut
http://www.extension.umn.edu/distribution/nutrition/DJ1091.html

Cheers,

Mark


UPDATE April 6, 2013

And two months later the finished product is ready to put in jars. You know it's finished when the taste is just tangy enough. It will mellow a bit once you put it in the jars and store in the fridge.

The eleven pounds of cabbage made 5 full large mason jars and a little extra.


Sauerkraut ready to eat and store in the fridge. ENJOY!

Enough to get us through to cabbage harvest.

Cheers,

Mark


Friday, January 25, 2013

Different Worm Species- Why red wigglers?

Different Worm Species: Why do I recommend red wigglers for indoor composting?

I get this question pretty regularly, or one of the related questions:
  • Can I mix different worm species?
  • Can I use wild caught worms from my yard or compost pile?
The best way to begin this is to consider the conditions various worm species require to thrive. 
 
The earthworm species most often used for composting are red wigglers (Eisenia foetida or Eisenia andrei). Red wigglers are ideally suited to the indoor compost bin: they prefer soil temperatures that are in the same range as the air temperatures where we are comfortable (65-75F), tolerate mixing and lots of food in their environment, reproduce rapidly, and consume a lot of food relative to their size. Eisenia worms can be found in old manure piles, but are not commonly found in yards in the northern US. Personally, I would not want to pick a pound of red wigglers out of a manure pile (and hope that I didn't grab any other critters) to start an indoor bin, but it could be done.

Although common nightcrawlers (Lumbricus terrestris) and field worms (Diplocardia or Octolasion) may be easily found in your yard, they are not recommended for indoor worm bin operations. These worms burrow deeper than most bins allow and generally require cooler temperatures than typical for the indoor environment.  Also, because they build burrows, they do not tolerate mixing (surface feeding is recommended) and may require dietary supplementation of corn meal or other foods to thrive. Indoor vermicomposting with nightcrawlers is a method that others use with success. If you're interested in trying night crawlers, I can refer you to experts who can help you on your way.

Because different worm species have different requirements, I do not suggest mixing worm species in your worm bin. If conditions become unsuitable for one species, they may die or leave your bin. 
 
In general, I recommend red wigglers for people interested in vermicomposting indoors. You really can't go wrong with a simple bin and a pound of bed run red wigglers.

Cheers,

Mark


Tuesday, January 22, 2013

Permaculture- What is it and why it is important


My definition of permaculture is "Integrating natural energy flow and tendencies into your home, yard, and garden to make them more sustainable, efficient, and productive".

Permaculture is a more thoughtful, not necessarily more labor intensive, way of gardening. Although more effort may be needed initially, a properly designed permaculture garden will be much less resource intensive (both in labor and monetary inputs) over time.

Designing for low input means low input of anything: money, time, labor, water, soil, fertilizer, pesticides, etc.  The goal of permaculture is to design systems so they are in balance and need no or little input to be sustainable.Low input should not be considered lazy design. If it requires less labor in the long run because your design is more creative, observant, and thoughtful, how is this bad?

This often means being flexible to adapt to failures and changing conditions. If a type of plant is not working in that location (soil type, light, moisture, then you can work to change the conditions or use a different plant there. This is a common theme for my yard and garden-- trial and error to learn what works best where. I am constantly moving plants (and losing some) as I learn the microclimates and microsoil conditions of my own yard. I consider these to be minor tweaks to the system and part of the natural process. Eventually, I will find the optimal location for a plant and there it will stay. If a plant is not happy where you have it-- do some investigating and move it.

The bottom line is that we should be working  with nature rather than against it, and Looking to nature for lessons. 

Check your local adult education office for courses on permaculture (http://www.maineadulted.org/).

Cheers,

Mark

Thursday, December 20, 2012

Worm Bin for Christmas!

(A reprise of a past blog)


A story that I heard a while back told of a worm bin and pound of worms as the hot item at a Yankee swap Christmas party.I believe that a worm bin and pound of worms make a great gift at any time of year.  The more people we have vermicomposting the better.
 
Worm bins need not be expensive or complicated. I think a simple bin is really a lot easier to use (and certainly easier to build for the gift giver!). The solid bottom bin style will never leak, and if you do not rely on bottom drainage, you cannot drown your worms (which can happen on bottom draining styles if the drain hole becomes clogged).
 

If you're not ready to commit just yet, I offer gift certificates on my website (see http://www.wormmainea.com/Gifts.html)

In my mind, the perfect gift would be a book on vermicomposting (like Mary Appelhof's book Worms Eat My Garbage: How to Set Up and Maintain a Worm Composting System), a pound of worms and a new bin (or a WormMainea gift certificate for these). If you are already vermicomposting, you can provide the worms and make the bin. If you're an experienced vermicomposter, you can provide vermiconsultation and skip the book.


WormMainea also has t-shirts for sale (variety of sizes for old and young). All are printed on organic cotton. Contact me if you are interested.
 
If you are looking for other gift ideas, I recently updated the Amazon lists of my recommended vermicomposting supplies, as well as favorite garden tools and books. Purchasing through my Amazon store costs you nothing and benefits maintenance of the WormMainea website.

You can view my Amazon store categories at:

WormMainea vermicomposting tools and supplies.


Cheers,
 
Mark


Saturday, December 15, 2012

The many benefits of vermicomposting


Let's review many benefits of vermicomposting


Benefits in your Home

  • Reduce the amount of organic matter in your trash

    1. fewer bags
    2. less stinky!
  • Provides free soil amendment and fertilizer
  • Great fun for children
  • You are recycling nutrients into your yard

Economic Benefits (Micro and Macro)
  • Saves you money
    1. you don't have to buy fertilizer
    2. directly save money if you have pay-per-bag for trash
  • Saves your town money
    1. less trash= less diesel to haul trash
    2. less trash= lower tipping fees at landfill
  • If your town uses trash-to-steam, organic wastes is not an efficient source of energy
Benefits to Soil (when vermicompost is used outside)
  • Improves its physical structure or tilth
  • Establishes and supports soil micro-organisms
  • Improves water holding capacity
Benefits to Plants
  • Improves plant health
    1. Enhances germination & growth
  • Improves root growth and structure
    1. Enhances uptake of nutrients and micronutrients

Environmental Benefits
  • Most of the above are great for the environment
    1. less diesel to transport waste
    2. recycling waste on-site
    3. reducing the need to produce fertilizer
  • Improving soil structure leads to healthier plants
    1. need less water
    2. need fewer pesticides
  • Improving soil in your yard= less runoff
If you're not vermicomposting, why not start today. If you already have a worm bin, consider giving a bin and some of your worms as a gift. Just make a bin and give a half gallon worms and vermicompost (bed run) from an active area of your bin to a friend or family member. They will thank you!

Cheers,

Mark

Sunday, December 9, 2012

Time to Bring in Your Bee Boxes


If you're in southern Maine, it is time to bring in your bee box


We brought ours in today. A bit later than usual, but everything was late this year (or so it seemed).

Place your bee box in the garage or shed (don't bring indoors!) and store it until spring.

I put ours out again in late March as soon as the ground thaws enough for me to stand them up in the ground.

Cheers,

Mark