Thursday, December 20, 2012

Worm Bin for Christmas!

(A reprise of a past blog)


A story that I heard a while back told of a worm bin and pound of worms as the hot item at a Yankee swap Christmas party.I believe that a worm bin and pound of worms make a great gift at any time of year.  The more people we have vermicomposting the better.
 
Worm bins need not be expensive or complicated. I think a simple bin is really a lot easier to use (and certainly easier to build for the gift giver!). The solid bottom bin style will never leak, and if you do not rely on bottom drainage, you cannot drown your worms (which can happen on bottom draining styles if the drain hole becomes clogged).
 

If you're not ready to commit just yet, I offer gift certificates on my website (see http://www.wormmainea.com/Gifts.html)

In my mind, the perfect gift would be a book on vermicomposting (like Mary Appelhof's book Worms Eat My Garbage: How to Set Up and Maintain a Worm Composting System), a pound of worms and a new bin (or a WormMainea gift certificate for these). If you are already vermicomposting, you can provide the worms and make the bin. If you're an experienced vermicomposter, you can provide vermiconsultation and skip the book.


WormMainea also has t-shirts for sale (variety of sizes for old and young). All are printed on organic cotton. Contact me if you are interested.
 
If you are looking for other gift ideas, I recently updated the Amazon lists of my recommended vermicomposting supplies, as well as favorite garden tools and books. Purchasing through my Amazon store costs you nothing and benefits maintenance of the WormMainea website.

You can view my Amazon store categories at:

WormMainea vermicomposting tools and supplies.


Cheers,
 
Mark


Saturday, December 15, 2012

The many benefits of vermicomposting


Let's review many benefits of vermicomposting


Benefits in your Home

  • Reduce the amount of organic matter in your trash

    1. fewer bags
    2. less stinky!
  • Provides free soil amendment and fertilizer
  • Great fun for children
  • You are recycling nutrients into your yard

Economic Benefits (Micro and Macro)
  • Saves you money
    1. you don't have to buy fertilizer
    2. directly save money if you have pay-per-bag for trash
  • Saves your town money
    1. less trash= less diesel to haul trash
    2. less trash= lower tipping fees at landfill
  • If your town uses trash-to-steam, organic wastes is not an efficient source of energy
Benefits to Soil (when vermicompost is used outside)
  • Improves its physical structure or tilth
  • Establishes and supports soil micro-organisms
  • Improves water holding capacity
Benefits to Plants
  • Improves plant health
    1. Enhances germination & growth
  • Improves root growth and structure
    1. Enhances uptake of nutrients and micronutrients

Environmental Benefits
  • Most of the above are great for the environment
    1. less diesel to transport waste
    2. recycling waste on-site
    3. reducing the need to produce fertilizer
  • Improving soil structure leads to healthier plants
    1. need less water
    2. need fewer pesticides
  • Improving soil in your yard= less runoff
If you're not vermicomposting, why not start today. If you already have a worm bin, consider giving a bin and some of your worms as a gift. Just make a bin and give a half gallon worms and vermicompost (bed run) from an active area of your bin to a friend or family member. They will thank you!

Cheers,

Mark

Sunday, December 9, 2012

Time to Bring in Your Bee Boxes


If you're in southern Maine, it is time to bring in your bee box


We brought ours in today. A bit later than usual, but everything was late this year (or so it seemed).

Place your bee box in the garage or shed (don't bring indoors!) and store it until spring.

I put ours out again in late March as soon as the ground thaws enough for me to stand them up in the ground.

Cheers,

Mark

Saturday, December 8, 2012

N-P-K Value of Vermicompost

One question I often get concerns the N-P-K of worm castings.

The first thing I want to discuss is the difference between worm castings and vermicompost.

Worm castings are literally worm poop. The processed material that has been eaten by worms and been excreted. If you have worm castings then you have worm poop. This is nearly virtually impossible to achieve in a home vermicompost system since the worms will run out of food and die before you achieve this. 

Vermicompost is more accurate. Vermicompost is what I produce (and most other vermicomposters produce). Vermicompost is a mixture of worm castings, partially composted wastes, and any resistant materials that won’t readily break down. Really high quality vermicompost should have a high percentage of worm castings, but will also contain some other material (my vermicompost often has some egg shells, coffee grounds, and some small pieces of bedding). These are not contaminants, as they don't harm anything when used to make tea, start seeds, or as top dressing (things I commonly do with my vermicompost.
 
So, I will use the term vermicompost in this discussion to be accurate. 

When I've had my vermicompost tested the results have sometime come back high (once as 2-1-1), but more commonly much lower (1-0.5-0 or 0.5-0-0) typically with high calcium (these probably differ depending on what I've fed the worms).

Do these numbers seem low to you? They would if you were to compare them with commercial fertilizer. However, the value of vermicompost (or worm castings) is more significant than a standard N-P-K fertilizer scale would suggest.

The N-P-K fertilizer scale was developed to give consumers information about hat hey were purchasing in commercially bagged fertilizer-- it tells you what's in the bag so you know how to apply it.

Vermicompost is far more complex than chemical fertilizer, and it contains many other substances (biological and chemical that improve soil and support healthy plants. Some of these include humus, worm mucus, and plant growth promoters like cytokinins.  In addition, vermicompost commonly contains ten times as much microorganism activity as plain soil (microscopic bacteria and fungi). 

All of these support a healthy soil food web. The microorganisms in the soil are able to provide the plant with everything it needs to be healthy. Because the soil is a living system there is no excess fertilizer to run off. Healthy soil makes for healthy plants.

The humus and worm mucus in the vermicompost helps the soil hold more water, retain its structure (or tilth), and stay aerated, while also providing binding sites for micronutrients that would otherwise wash out of soil during heavy rains. 

So, as you tend to your worm bin this winter think about the great soil amendment that your worms are making and how wonderful your garden will be next year...

Cheers,

Mark


Tuesday, November 20, 2012

Next Steps

I've been asked about the next steps after your bin is up and running. How long does it take to fill a bin...

The next steps and speed you need to employ them really depend on you.

How warm is soil? Food breaks down more quickly and the worms reproduce more rapidly in warmer soil. Soil temps are cool if 45-60F. 60F and higher is considered warm. 

What kind if food do you put in? Some food breaks down more quickly than other types. Think about a potato and a strawberry on your counter. The potato is good for months, but the strawberry turns to mush and gets grayish mold in a matter of days. The same thing happens in your bin. Remember the worms need to food to break down before they eat it. Some food is almost immediately available for the worms to eat, and other types of food takes much longer (stalks of Brussels sprouts, ends of asparagus, broccoli stems, etc.)

How large are the pieces of food? Food breaks down faster in smaller pieces (larger surface area). 

All of these determine how fast the worms reproduce (typically 10-12 weeks), but that difference adds up in a few generations. So, I typically respond to this question as follows: an 18 gallon bin with a pound of worms will be filled by a family 4 in 3-6 months (filled as in the bin will be 2/3 full and ready to harvest). Closer to 3 months if the bin is in a warm area and the family juices weekly. (If you juice you're putting in a pound or more fruit and veggie pulp which breaks down in days). Closer to 6 moths if the bin is in a cooler area and larger pieces are added.

All that said, most people will find that they can harvest once yearly and be fine. You can harvest sooner, but you do not need to. I recommend harvesting at least annually.

Remember that Christmas is coming. If you're bin is a bit full, consider giving a pound and a bin as a gift this year. Scoop a half gallon of worm castings and worms from an active area of your bin (under the  bedding). This is bed run. That is just what the new bin needs to get off to a great start.

Regards,

Mark

Sunday, July 8, 2012

Intellicon: great product with excellent warranty

After several years of service and savings (see my blog from 2009), our Intellicon had an issue in late 2011. The unit had a sensor fault (see below photos from early in the fault). Average savings of 24.3% for ET 3417.7 hours.


I contacted Intellidyne (manufacturer) with my serial number, installation date, name of installer and reported error.

Michelle Arroyo answered my call and sent me out a new sensor at no charge. 

The part arrived (with instructions) and I installed it over lunch. It was so easy!
 
This kind of service is remarkable. Intellidyne makes a great product and stands behind it.

If you have an oil boiler, look into adding one of their retrofit units.

Cheers,

Mark

Sunday, June 17, 2012

Make your own compost tea!

Come on, it's easy!!

Here's my recipe for vermicompost tea:  http://www.wormmainea.com/Compost_tea.pdf
Tip of my hat to my collaborator Bruce Deuly from Texas of Deuly's Own Organics for helping me scale the recipe down to 5 gallon bucket size.

You can substitute any compost for my vermicompost.

By the way, I now routinely add 1T Neptune's Harvest and/or 1-2T seaweed (dried & pulverized by putting in a bag and running over with my car) from Scarborough beach along with unsulfured molasses or barley malt syrup. 

More information on making and using compost tea or vermicompost tea can be found here:

All the supplies you need for making tea can be found in my Amazon store. Every view and purchase made supports WormMainea. Thank you!

Cheers,

Mark

Saturday, June 16, 2012

My reluctance to scaling up vermicomposting operations

In the past year or so I have had many people ask me one of the following questions:

"Why can't you sell me worms this week (how can you be out of worms until next week)?"

"Can you supply me with 10# next week or tomorrow?"

"Why don't you make this your business?"

The specific answers to these questions differs, but they all have a common element: vermicomposting is my hobby. I do it when I want and spend only as long as I want on it. That way it is still enjoyable to me. My low-pressure attitude does take a few hits as I must keep my herd fed and plan for my annual trip to the Common Ground Fair, but otherwise I tell people that my scale of operations (FMI see Virtual Tour of WormMainea) only permits me to sell so many pounds per week (a number that varies depending on how much I did a few months ago and how much I was selling in the past few weeks). 

My personal reasons for not “expanding my worm operation” is deeply rooted in my desire to retain this as an enjoyable hobby. To expand to a commercial level operation (or to consider this as my business) would require changes in the way I grow, because as it stands I don't really track my labor by it can't be more than minimum wage. I would also need more space which would come at a price either outside the home [rent $] or taking over more of the basement [peace in my home life]. Also, to be commercially viable I would probably need to exploit efficiencies of scale (to make my time investment worthwhile) by investing in better equipment: a food shredder, grow mats or heated tables, etc. 

For me to operate WormMainea as a hobby limits my production to 3-6 pounds of worms per week (as I said earlier temperature, previous sales, and past attentiveness influence this). With sufficient notice I can supply perhaps as much as 10#, but when I sell more to a single person, I have to compromise and sell to fewer individuals. This generally works out and customers are typically very understanding and reasonable. But this brings me to my point: a better alternative to scaling up is for me to continue to encourage other growers in Maine (and elsewhere) to replicate my operation. No, I don't feel that it is necessary for me to ship worms outside of New England

Some people are naturally inclined towards business, and vermicomposting is a hobby with potential. If you like growing worms and have the space to accommodate multiple bins, why not give some to your friends and/or put some up for sale on Craigslist (or elsewhere)? The compromises one would have to make to sell on an economically viable scale may not be major obstacles for everyone. I suggest you start small and figure out if you want to expand.
Cheers,

Mark

Sunday, June 10, 2012

Air source heat pump

Our energy auditor saw this on Green Building Advisor and forwarded it to me (Thanks Erik!). 

The article discusses using solar electric and grid-tied air source heat pumps (like our GeoSpring) for hot water supply.

Read the article at http://www.greenbuildingadvisor.com/blogs/dept/musings/solar-thermal-dead

Cheers,

Mark

Saturday, June 9, 2012

Taking Soil Samples for Soil Test

Since I posted my blog on interpreting soil sample results, several people have asked me about collecting soil samples. 

Collecting soil samples for your soil test is easy. Here is how I do it.

Make sure that you follow the directions exactly included with either type of test kits as it will affect the results of the test. Always make sure to use clean tools and bucket.

When you take the sample, make sure the soil is not too wet from any recent rain or prolonged watering. To get the best results take the sample before any fertilizer has been applied or at least not recently applied.

To begin you will need a clean pail or mixing container. Unless it is brand new then make sure that is well cleaned (rinsed out & dry). By not washing the pail out carefully any remnants of prior use could register in the soil test.

Use a shovel to dig a small hole 3 to 6 inches deep. With the shovel, after the hole is dug, take a sample of the turf and soil plug from top to bottom. I shoot for a sample that is about 1" down from green part of the grass (where the dirt is). That is the sample you will use for the test. Once you have the sample, place it into the pail.

Taking a soil sample from the 3-6" depth of a soil plug
To make a composite sample that is representative of the whole yard (or area you want to have analyzed), take samples from various parts of the yard. You want a total of 30 samples (this year I collected 15 from front and 15 from rear). I use my rake (shown in the photo above on the left) to take samples every 1.5 meters in a crisscross pattern. From each area try to put approximately the same amount of soil into the bucket.

Avoid areas that are near the drip line (especially if you have lead-based paint). If the soil is not dry, then put the pail aside in a sheltered, dry location and let the soil dry overnight.

Boxing up my dry mixed soil sample
Combine the soil thoroughly in the pail and remove the amount the lab requires for the test. Put the sample in the container approved for the test and mail it as directed or return it to the testing office. By mixing the soil you will be providing a typical sample. This way the sample is representative of the areas sampled and the corrective measures recommended (e.g., fertilizer) can be done evenly over all those areas the yard.

Cheers,

Mark

Friday, June 8, 2012

Gypsum for Lawns


If you have a lot of dandelions (often an indicator of imbalance in magnesium-calcium ratio) or if your soil test (see related blog entry) suggests your lawn needs more calcium (in our area this is probably likely), one of the best ways to correct the imbalance it is by spreading gypsum on your lawn. Correcting the calcium-magnesium balance also helps to prevent soil compaction.

Gypsum (instead of lime) also increases pH (in 2010 my soil test told me my pH is still a bit to acidic for the grasses I was growing.

According to the results of my soil test and the recommended target calcium level for soil, I applied 5# of pelleted gypsum per 1000 square feet (about half what I estimated I would need to add per year for 3 years) . For my approx 5000 square feet of turf lawn area that meant I'd use a little more than half a bag each application and need a bag a year for 3 years. Will use the last of my bag this fall and should be finished with gypsum amendments.

In the past I purchased my gypsum at ACE or Broadway (I prefer the Organic Traditions brand), depending on where I have a coupon. It comes in 40# bags, and I prefer pelleted gypsum because it is easy for me to spread it by hand (I don't own a drop spreader).

FMI see related posts: 

http://www.wormmainea.blogspot.com/2012/06/soil-testing-results-and-interpretation.html

http://wormmainea.blogspot.com/2010/04/natural-lawn-care-preparing-and-timing.html

Cheers,

Mark

Tuesday, June 5, 2012

Soil Testing: results and interpretation

The image below shows the results of my spring 2012 soil test for my lawn areas. This was the $33 test from University of Maine Cooperative Extension. While the test may seem a bit expensive, the information provided is well worth the price.


2012 Soil Test Results


Previous years' tests had suggested I needed to add more compost (hence my earlier blog showing overspreading compost), and this test shows that I can still use a bit more compost. 


My calcium and pH levels are shown as above optimal, but the levels shown better suit my grass strain (see photo below). I achieved these higher levels through the addition of gypsum (gypsum raises pH, makes soil nitrogen more available, and prevents compaction and salt damage) over a four-year period (I used approximately 80 pounds per year on my lawn area). I will have a blog later this month devoted entirely to gypsum.


Photo of lawn-- look at that beautiful clover!


Interpretation of Soil Test Results


Macronutrients (N-P-K)
 These are all in the reasonable range. Some may say that my nitrogen level is low. I would not argue that the reading is low, but I expected as much. This is before any work on my lawn and my addition of compost and vermicompost tea will get the microorganisms fired up to start making nitrogen available. Also, I have clover in my lawn to pull nitrogen out of the air and fix it in the soil. I will not “fertilize” my lawn with nitrogen based fertilizer because it is not really needed. If you read the fine print, I would use 2 pounds of nitrogen per 1000 square feet, but only ½ that in late August (because I mulch my clippings) and because of organic program I would use only ½ of that. That takes me to ¼ pound of nitrogen per 1000 square feet. My compost overspreading this spring should supply my needed nitrogen as well as any sulfur and potash.


Soil Life (Microorganisms)
My microbial biomass index is 44ppm, which is on a 1-100 scale. I am trying to get closer to 60ppm (optimal range). As I add more compost to the lawn (recall that I took these samples before my spring 2012 compost overspreading) the level will increase.


Micronutrients
The decrease in micronutrient availability to plants as pH increases is not a great concern to me because it is a balancing act (given my increased pH and additions of humus-rich compost to the yard). Also, I plan to supplement my vermicompost tea with sea weed this year to boost the level of micronutrients that are available to the grass plants.


Long View
My long-term goal is to have no external inputs to my lawn (just aeration, overseeding as needed, and vermicompost tea), so everything I do is a step in that direction. It is important to remember that small steps are the best approach. Make sure your additions are based on the recommendations in the soil test. You don’t want to overshoot—that would waste both money and time. Remember that I am mulching my lawn clippings, so there is no net loss of anything (macro or micronutrients).


Early in your organic switch, you should test your soil annually to check your additions. After that you can back off to once every three to five years-- preventive lawn maintenance. If lawn problems develop more frequent testing may be necessary. 

Sunday, June 3, 2012

Saving Water and Money-- Low Flow Shower Head

For a gift a few years ago Bert gave me an EPA Water Sense approved low-flow shower head. I recently purchased one that has a much lower flow rate (1.5 gallons per minute, compared with older shower heads that use as much as 8 gallons per minute), while still delivering a comfortable and large non-aerated spray.

Even more money is saved by some shower heads, as they automatically turn off the flow of water once the water gets warm, until you're ready to use it!

If anyone would like to know the specific product that I purchased, please message me and I can provide the details.

An example description from the manufacturer/model I chose is shown below:The features offered by this shower head include a maximum flow rate of 1.5 gallons per minute, a pressure compensating flow regulator (insuring consistent performance from 40 to 80 psi of water pressure), a non-aerated rain style spray pattern to deliver better water coverage and showering comfort, along with reduced diameter spray nozzles to improve the shower feel. The most unique feature, however, is the ShowerStart technology. When the shower is initially turned on the ShowerStart device monitors the water temperature. When the water temperature reaches bathing temperature, (95° F / 35° C), the conservation mode is activated and the device “triggers a trickle”. This prevents your hot water from running down the drain before you're ready to get in the shower. Not only have you eliminated the water and energy waste, but the sound of the trickle tells you that your shower’s ready. The water for your shower is now warm and waiting instead of warm and wasted. Turn the valve on the shower head, the water flow will resume, and enjoy your shower. After each shower the ShowerStart device will automatically reset.

These shower heads cost more, but the return on investment is as little as 1 year, while saving hundreds of gallons of water in that same amount of time. 

Tuesday, May 1, 2012

"Organics Just as Toxic as Synthetics"


This is something I've been hearing recently. This blog also extends to discussions of requests for MSDS (Material Safety Data Sheets) for organic products. First, let's be clear about what an MSDS is: this is an information sheet containing physical and chemical information on a particular substance. It quantifies that substance's risks, safety and impact on the environment. Everyone can use these sheets, although they are mainly designed to provide workers, transporters, and emergency personnel with procedures for handling and working with various substances in a safe manner. 

I feel that these arguments are nothing more than a smoke screen intended to confuse people. 

Yes, it is true that some organic products are toxic and even dangerous: organic biocides (herbicides and pesticides) are toxic. They have to be, since they are intended to kill something. We must all recognize that everything in our environment is potentially hazardous. "All substances are poisons; there is none which is not a poison. The right dose differentiates a poison from a remedy" -- Paracelsus (15th century father of toxicology). If a substance was designed or produced to kill something, it is not likely to be really good for you.
 
In my mind, the difference between synthetic and organic herbicides and pesticides is that many if not all of the commonly used organic products are based on chemicals that are produced by organisms (like your body). For the most part your body has systems in place to detoxify these because they are not novel agents. 

Also, the adverse effects of exposure to these are limited and not a big surprise: boiling water burns, vinegar is an acid, don't get dirt or compost or dust in your eyes and try not to inhale it because it can make you choke. DUH! These effects are far different from synthetic chemicals that can interfere with hormones in your body and result in endocrine disruption or cause DNA damage or hurt your nervous system and brain.

However, such discussions of product safety misses the point entirely. Organic lawn care should emphasize changing cultural practices to make the plants you want to grow more healthy. Organic practices choose the best plant for the situation and provide that plant with what it needs to thrive. Plants that are thriving will generally be less susceptible to disease, insect infestation, or competition from other plants.

To accomplish this you need to understanding what species and strain of plant will do well in your environment and giving it what it needs. Choose your plant species and strain based on what best suits your environment (light conditions, water availability, traffic, etc). In general, healthy soil leads to healthy plants. Start with understanding your current soil condition (what is the pH, nutrient and organic mater levels, etc.? how compacted is it? how wet/dry is it? loamy, sandy, clay?). Then determine how much it will cost (including labor) to get from where you are currently to where you need to be for your plant species/strain to thrive. Based on the resources required, do you want to rethink your plant species/strain?

The most commonly used product on an established organic lawn should be compost and compost tea. During transition and perhaps to deal with an occasional problem, a product may be necessary to address an infestation or issue (e.g., horticultural oil to smother insects). A MSDS for compost tea or compost is a silly request. My vermicompost tea is water, vermicompost, air, and molasses. Do you really expect an MSDS for dilute muddy water to be informative? Don't get it in your eyes and don't drink or breathe it. Wash your hands after use. DUH! 

By emphasizing that organic lawn care should emphasize practices to make plants healthy by addressing problems (not products that address signs and symptoms of problems), we can move beyond these discussions.

Cheers,

Mark

Saturday, March 31, 2012

Organic Lawn Care — Spring

By request, I am compiling my organic lawn care recommendations in one place and starting a WormMainea YouTube channel.


In this video I show how to core aerate with the Yard Butler*


In this video I demonstrate overspreading compost


I also took a soil sample from the yard to see whether I am getting close to my target organic matter level and whether need to do anything else (calcium, etc.). I took a composite sample from 15 areas (5 front yard, 5 side yard, and 5 back yard). These approximately equal small samples were mixed in my soil tub and then placed in the box.

Collecting a soil sample for the University of Maine Cooperative Extension Soil Test


Here are links to some of my earlier blogs related to lawn care

http://www.wormmainea.blogspot.com/2010/04/natural-lawn-care-preparing-and-timing.html

http://www.wormmainea.blogspot.com/2011/04/integrated-pest-management.html

http://www.wormmainea.blogspot.com/2010/09/how-well-does-organic-lawn-care-work.html

http://www.wormmainea.blogspot.com/2010/04/thoughts-on-weeds.html


*The Yard Butler D-6C Core Lawn Aerator is great for established lawns or lawns where a lot of activity takes place. Core aeration reduces compaction and thatch to let air, water and fertilizer down to the root zone. Core aeration also stimulates root growth by “pruning” the roots and deposits valuable micro-organisms on the lawn surface. I find this tool a lot easier to use than the gas-powered beast I rented from Home Depot a few years ago. And, because I have it available, I can use it to aerate compacted areas when someone drives on the lawn.

Sunday, March 4, 2012

Cold frames

Ever considered building your own cold frame?


Making and operating your cold frame is easier than you probably think and MUCH cheaper than a greenhouse.

First a tip of the hat to Elliot Colman, who showed me how to keep my cold frame going. His excellent book contains information and suggestions to build cold frames. My simple wood and polygal cover is based on his recommendations. I use the garden carts to secure the lids (from both wind and squirrels).

Here are a few photos of my cold frame

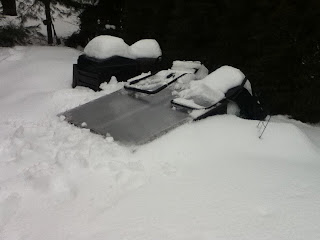
As you can see it it pretty well buried in snow.

Photo from the front-- I keep the polygal clear to prevent collapse and let the sun in

A close looks shows just a hint of the greens grown on the left side

Here is a peek under the lid. 

That's claytonia growing. I sowed this in early November when the cold frame soil was still warm. It will cut and come again a little (VERY SLOWLY). I cut the right side and it is gone.
The lid is polygal and not attached to the frame. I keep it closed this time of year and will only begin to open it if the weather really warms and soil temps get above 65F. Usually, that doesn't happen until April (but who knows this year). Come May, I switch to a lighter lid that I can handle more easily and has more ventilation (only closing when we have a clear night with frost).

When the growing season starts (typically June), I put the covers away and refresh the soil in the cold frame with compost. I try to run a summer crop of something completely different to prevent pests. This year, I may sow some wild flowers-- I just have to be careful to cut them before they go to seed.

Cold season seed recommendations for Maine:

Claytonia-- this is VERY forgiving and quite tasty in salads-- even on it's own. It is my favorite for my cold frame.

Mache (Corn salad) also works well, and I will sow this next weekend on the right (vacant) side after adding some aged vermicompost. It is as forgiving as claytonia, but because you harvest nearly the whole plant when cutting and it doesn't come again. For me, it is perfect for sowing in early March for a late April & May harvest. The last crop before turning the cold frame over for the summer planting.

Spinach works OK. I have had mixed success overwintering spinach. I mostly plant it early (before I start the claytonia)

Cheers,

Mark


2013 Cold Frame Update

Here is how my cold frame looked last weekend-- overfull and ready to harvest.


I've been battling a case of shingles, and my harvest was a bid delayed.

I switched to my non-insulating cover (ripple plastic instead of the polygal).

Come early May, I will remove the cover completely and clean it all out for the summer plants.

Cheers,

Mark

Saturday, February 25, 2012

More thoughts on large scale vermicomposting

A few weeks ago I had an e-mail conversation with a person from Mt. Abrams ski mountain. She was interested in using vermicomposting to help achieve conservation goals.

I shared the following information and considerations. I thought I would open this discussion to share with others and solicit additional information.

In general, vermicomposting could be used to save $$ on solid waste disposal and be good for the environment. However, there are some limitations and challenges that should be considered.

I have a related blog about that somewhat relates to these situations and presents some of my earlier thoughts (http://wormmainea.blogspot.com/2009/03/sourcing-food-for-my-herd-and-dreams-of.html).

I think your best bet is to partner with someone who is already making compost (either a farm or facility). Here is a list of compost facilities I found on the DEP website: http://www.maine.gov/dep/maps-data/documents/compostfacil.pdf

Second best option would be to set up your own on-site outdoor composting (knowing that without a lot of effort it will be mostly dormant during winter). The obvious drawbacks here are staff hours to maintain, the possible need for permits, and then the possibility of attracting pests (large and small).

The tricky part for vermicomposting on your scale will be sizing your herd that allows for reasonable processing of the compostable waste. I suspect your additions will be seasonal (obviously). This can be tricky for vermicomposting, because you're better to scale too big than too small to be able to process the maximum additions so you don't have problems (bad smells, etc). However, that can be expensive and difficult to maintain (food supply must be consistent for a stable population). Look at my situation, I import compostables to feed my herd to maintain a population that permits me to sell or donate (on average) about 1 pound of worms per week.

Perhaps that is another viable solution: can you get enough staff/coworkers to set up worm bins at home who may be willing to bring a bucket home for their worms? A decentralized system like this can work, but you have to have enough people to make it work. This may not be reasonable for you, but it is part of the discussion that should be mentioned. It can work and provide staff with a great source of vermicompost.

A final consideration for vermicomposting is managing the waste prior to addition. Vermicomposting is a bit more restrictive (in terms of what can be added) than outdoor hot compossting. Salt and oil in particular must be limited. This can present challenges (problems) during collection, and will require education of all involved.

In all honesty, I think your best solution is to find a local farm or compost facility to take your waste. Like solid waste disposal, there will be costs associated with this, but the costs should be less than landfilling (since the receiver is able to make & sell a product). I think we need more compost facilities in Maine to provide solutions to business and compost for Maine citizens. Until Maine businesses demonstrate a need for these as a service, the growth of these operations is slow. I am very please to learn that Mt Abram is moving in this direction.

I don't want to discourage you, but I want you to benefit from the many discussions I have had with schools and businesses looking to incorporate vermicomposting into their waste stream.

Cheers,

Mark